- Right-click the position drawing.
- From the context menu, select "Dimension":
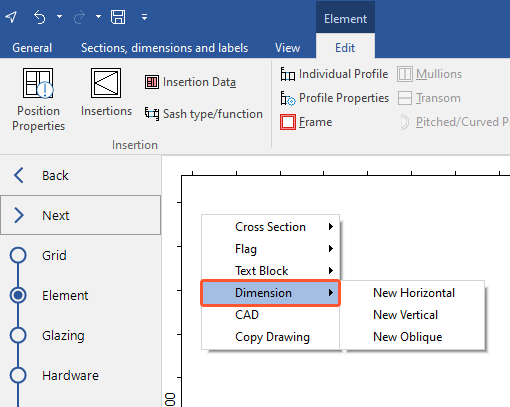
- Select if the dimension should be displayed horizontally, vertically or oblique.
- Left-click to set the start point of the dimension line.
- Left-click to set the end point of the dimension line.
- Define the dimension settings:
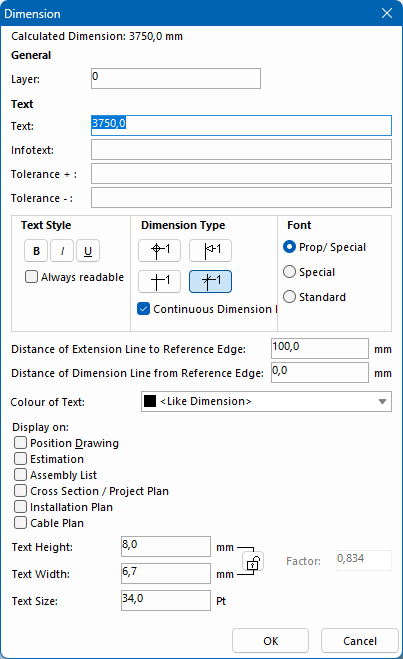
- The calculated dimension is displayed above the input fields and has already been entered automatically in the "Text" field.
- If necessary, enter an info text. This will be placed below the dimension line.
- If necessary, enter tolerances, e.g. for fits.
- Optionally select under "Text style" whether the font should be displayed bold, italic or underlined.
- Select "Always readable" to automatically keep the font angle between 90° and 180°.
- Under "Dimension type", define how the start and end point of the dimension line is displayed.
- Select "Continuous dimension lines" to place the dimension value above the dimension line.
- Select a font.
- Select the printouts on which the dimensions are displayed.
- Define the text height, width and size.
- Click the lock symbol to enable the "Factor" option. The factor adjusts all values proportionally to your entries.
- Click "OK" to confirm the entries.
- Move the dimension with the mouse and left-click to place the dimension:
Edit dimension
- Right-click the dimension you want to edit.
- In the context menu, select "Dimension" > "Edit". In the following window you can make changes.
Delete dimension
- Right-click the dimension you want to delete.
- In the context menu, select "Dimension " > "Delete".
Was this article helpful to you?
Yes
No
1


 Deutsch
 English (UK)
 Français
 Italiano
 Ελληνικά